Adding Shortcuts To An App - Part Four
In the last post we looked at:
- In-App Intent Handling (accessing data directly from our app)
- The new ‘visual list’ API
- How to interact with Shortcuts using the new Swiftui app model in iOS14
- Outputting custom types
In this post we’re going to continue the same iOS 14 project we started and we’ll explore how we can use arrays of custom objects as rich lists in shortcut parameters and how to take data input in a shortcut action and display it in our SwiftUI app.
This project’s code is available in full on GitHub.
Let’s get started!
Step One
In this tutorial, we’ll add a new Shortcuts action to our app which will let the user choose one of the people saved in our app and open their detail page as a modal sheet.
You’ll also be able to add a string in a ‘note’ parameter to demonstrate how you can pass data into your app from Shortcuts.
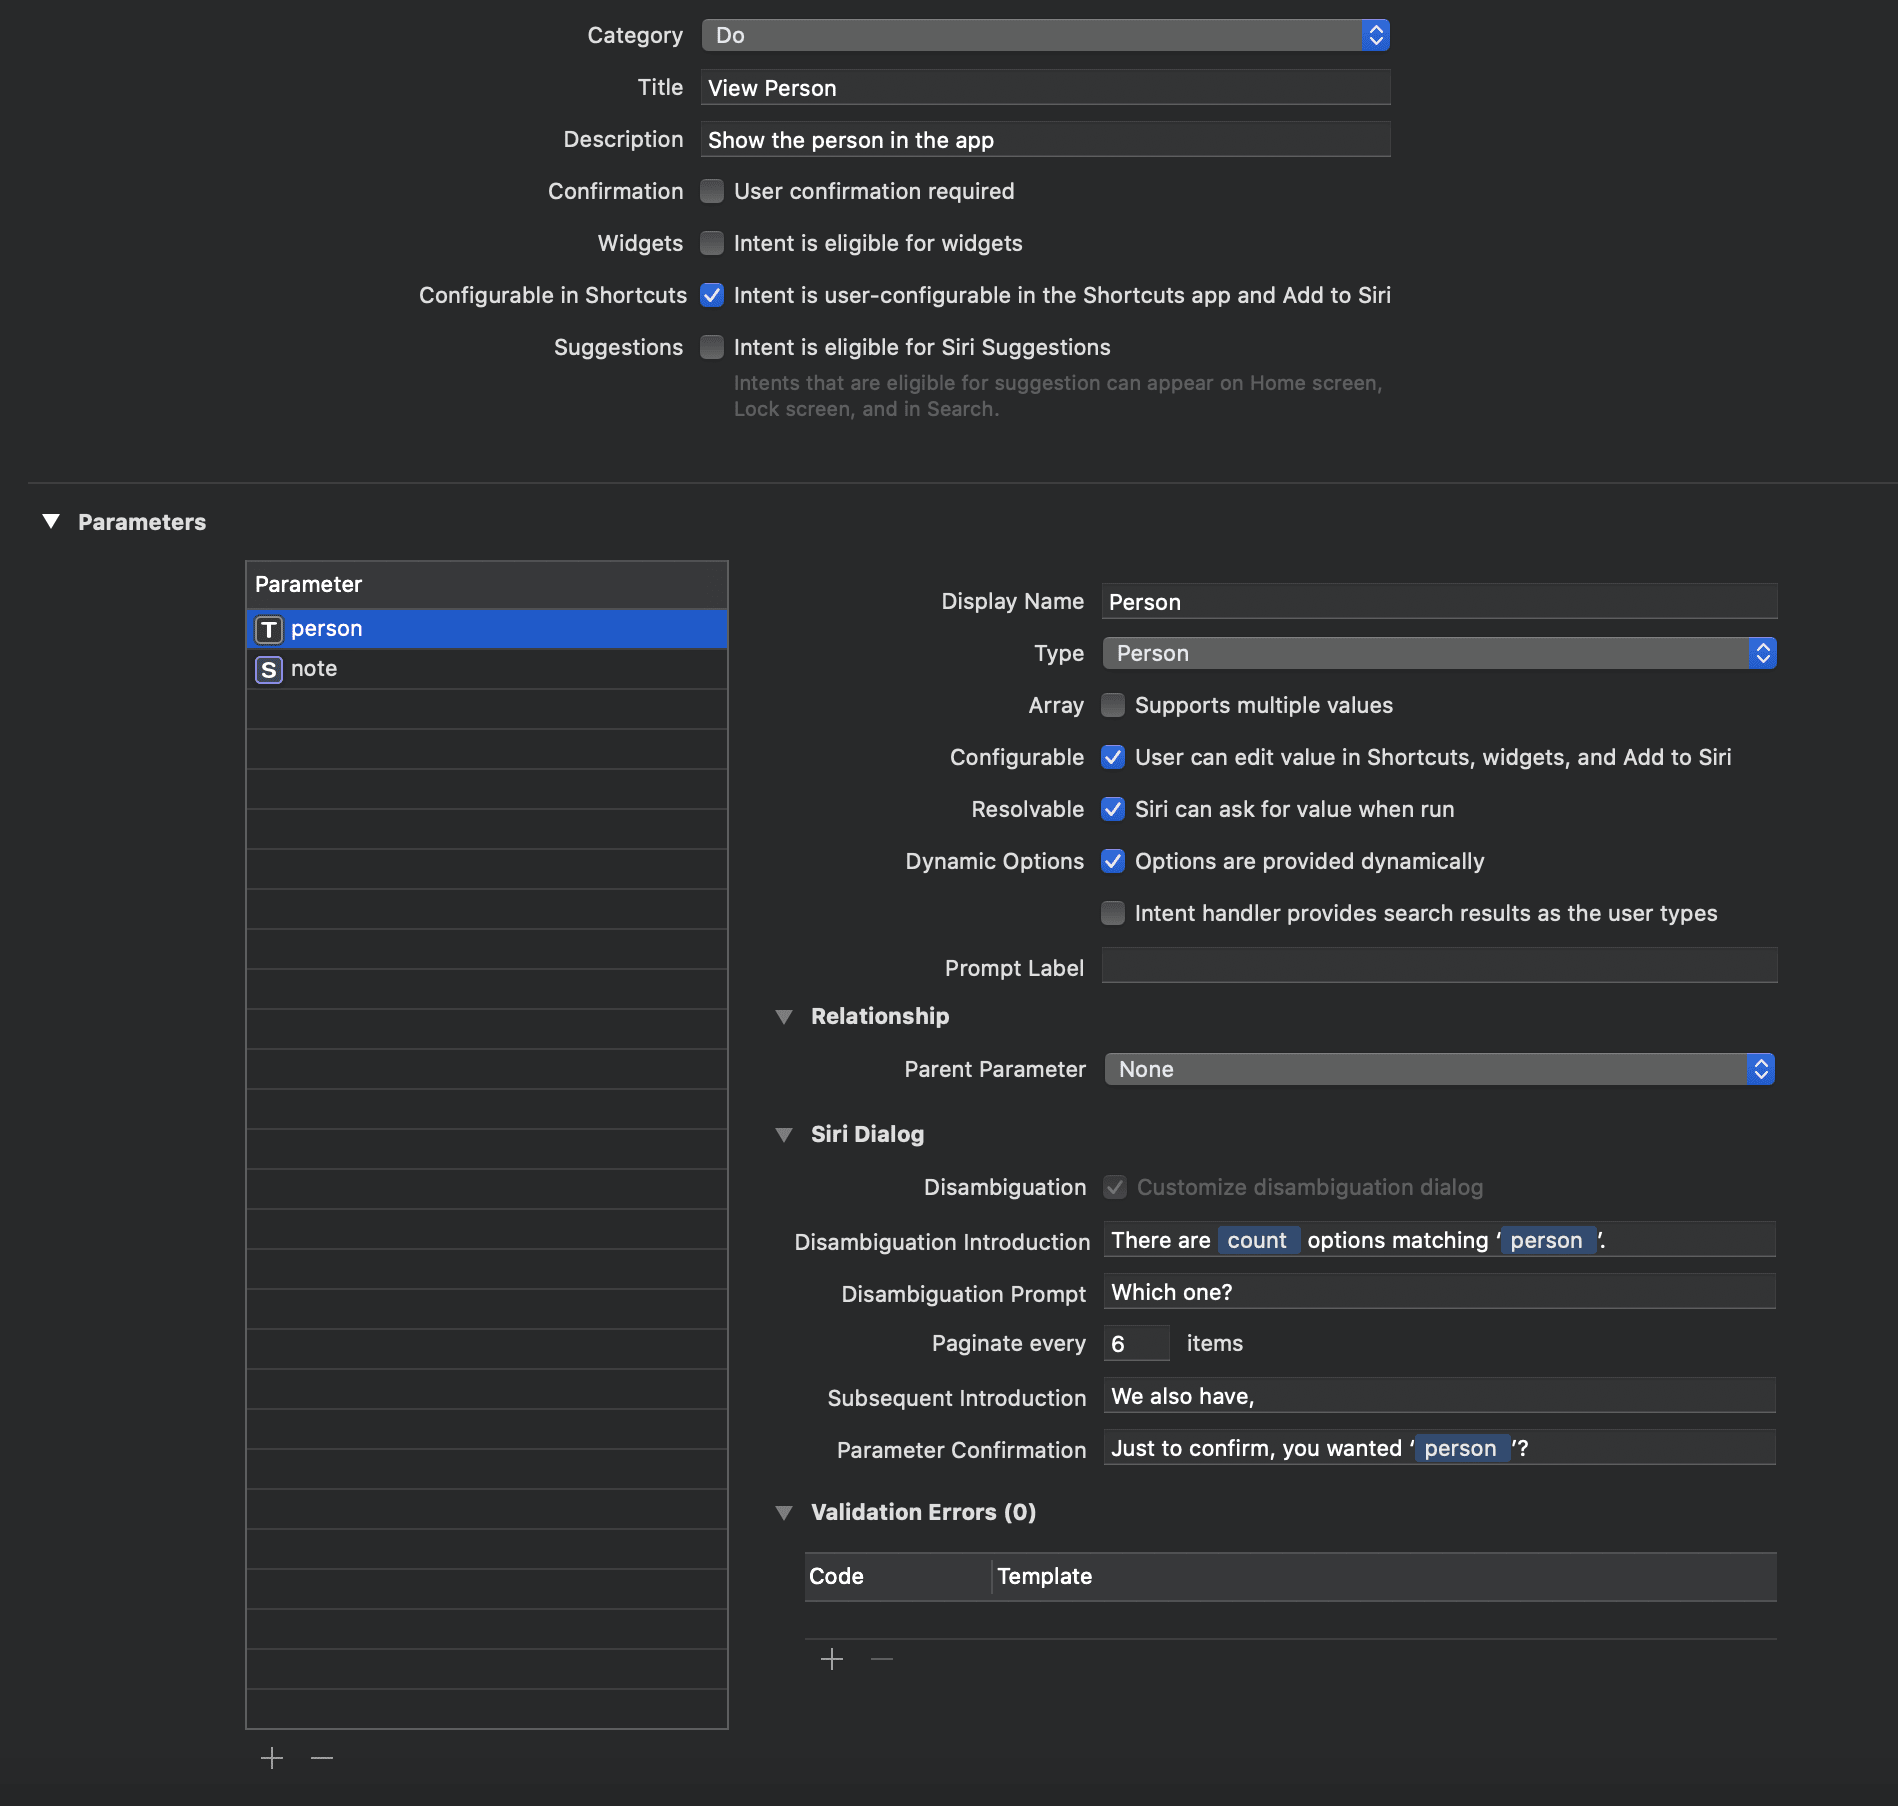
Firstly, let’s add a new intent called ViewPerson to our IntentDefinition file.
We’ll add two parameters. The first is person, which will let us pick from the array of people saved in our app (using the visual list API).
Make sure the type is set to Person (this is the ShortcutsPerson type we defined in our intent definition file last tutorial), and that “Options are provided dynamically” is also ticked.
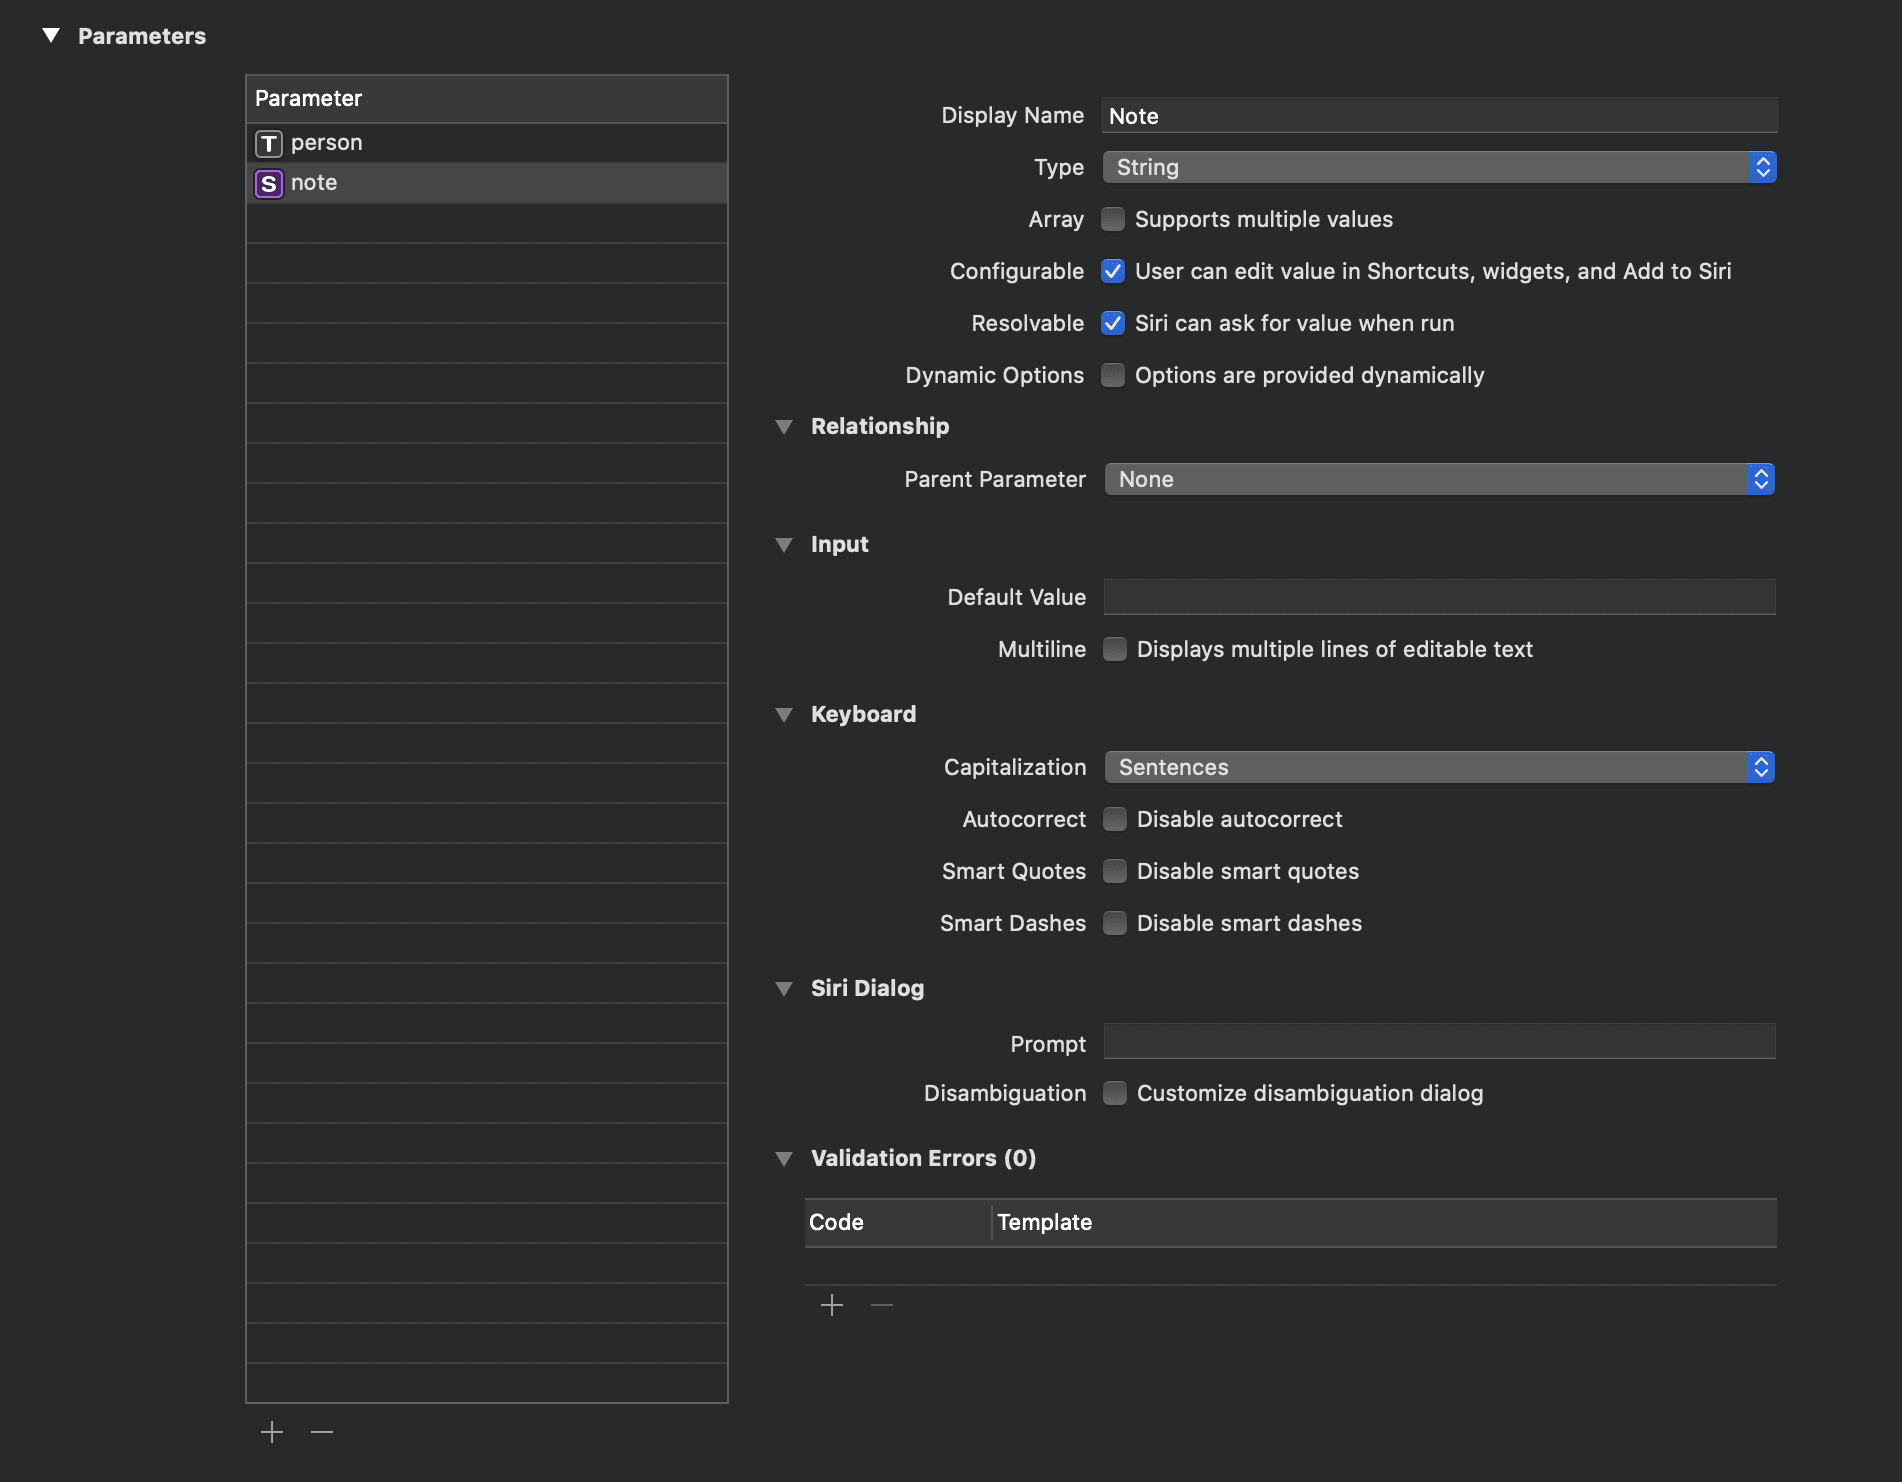
Next, add a note parameter. This is a simple string that will be displayed on the person’s detail page when the app opens.
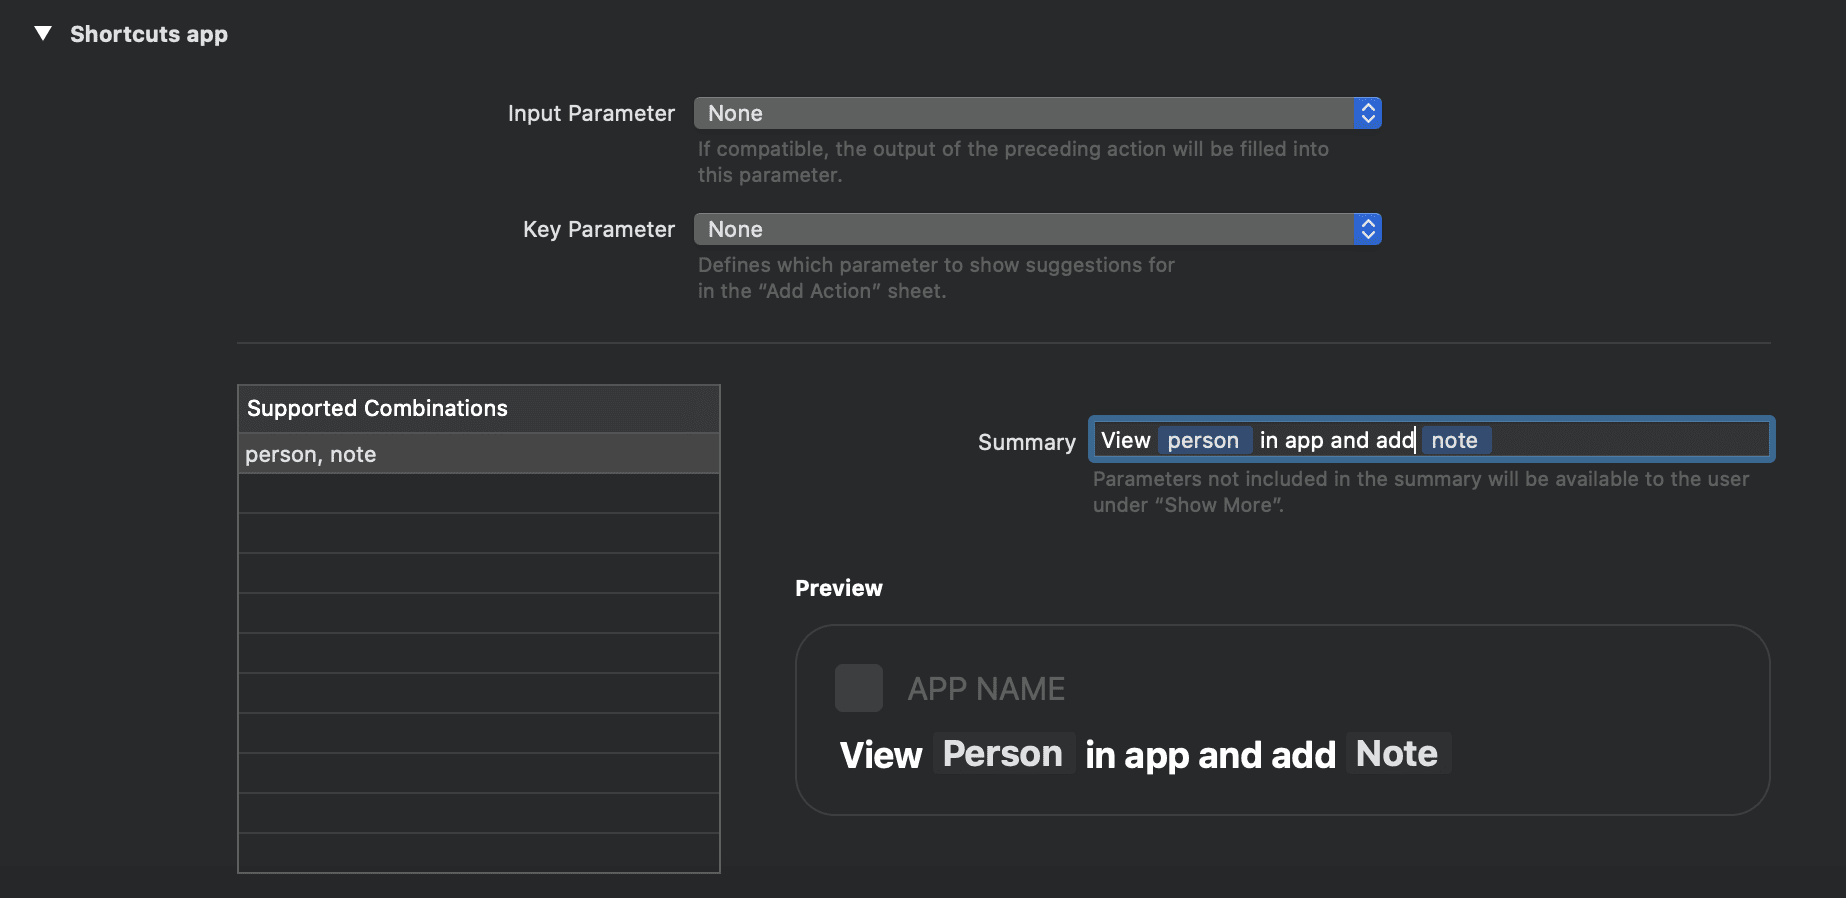
Finally, add a sensible summary to display on the shortcuts action.
Step Two
Now we’ll configure our SwiftUI views to react to a change of state.
When the user selects a person in the shortcut action, adds a note and then runs the shortcut, we’ll open the app and display a modal containing the detail page of the person the user has selected, including the new note text.
In our PeopleViews.swift, we’ll change our PersonDetailView to accept a Binding string for the note and change the layout so that we conditionally show the text if the note text isn’t empty.
struct PersonDetailView: View {

	var person: Person
	@Binding var note: String

	var body: some View {
		List {
			HStack {
				Text("Job")
					.foregroundColor(.secondary)
				Spacer()
				Text(person.job)
			}
			HStack {
				Text("Icon")
					.foregroundColor(.secondary)
				Spacer()
				Image(systemName: person.iconName)
			}
			if note != "" {
				HStack {
					Text("Note")
						.foregroundColor(.secondary)
					Spacer()
					Text(note)
				}
			}
		}
		.navigationBarTitle(person.name)
	}
}
In our PeopleListView, we don’t need to worry about about the note binding since this this won’t be the entry point for showing the modal when triggered from our shortcut action. We can just feed an empty note string using a .constant("")
struct PeopleListView: View {

	var people = peopleArray

	var body: some View {
		NavigationView {
			List(people, id: \.id) { person in
				NavigationLink(
					destination: PersonDetailView(person: person, note: .constant("")), // Adding in a constant empty string here
					label: {
						Label(title: {
							VStack(alignment: .leading) {
								Text(person.name)
								Text(person.job)
									.foregroundColor(.secondary)
									.font(.caption)
							}
						}, icon: {
							Image(systemName: person.iconName)
						})
					})
			}
			.navigationBarTitle("People")
		}

	}
}
Step Three
In the ShortcutsExampleiOS14App.swift file, we’ll add an optional @State for the person we want to pass to our detail view and set it to nil. We’ll also add an empty @State note string.
@State var personToShow: Person? = nil
@State var note: String = ""
We can use a .sheet modifier attached to the PeopleListView() with the @State var personToShow as the data source. Because we’re accessing a new modal sheet, we need to wrap it in a NavigationView so that our navigationBarTitle displays correctly
.sheet(item: $personToShow) { person in
	NavigationView {
		PersonDetailView(person: person, note: $note)
	}
}
Once the personToShow value is no longer nil, the modal will display.
This is what the whole file looks like now:
import SwiftUI
import Intents

@main
struct ShortcutsExampleiOS14App: App {
	@UIApplicationDelegateAdaptor(AppDelegate.self) var appDelegate
	@State var personToShow: Person? = nil // The person we'll pass in to our detail view
	@State var note: String = "" // The note we'll pass into our detail view

	var body: some Scene {
		WindowGroup {
			PeopleListView()
				.sheet(item: $personToShow) { person in
					NavigationView {
						PersonDetailView(person: person, note: $note)
					}
				}
		}
	}

	// This class lets us respond to intents in an iOS14 SwiftUI app
	class AppDelegate: UIResponder, UIApplicationDelegate {
		func application(_ application: UIApplication, handlerFor intent: INIntent) -> Any? {

			switch intent {
				// If the intent being responded to is GetPeople, call the GetPeople intent handler
				case is GetPeopleIntent:
					return GetPeopleIntentHandler()
				default:
					return nil
			}
		}
	}

}
If we try to build and run, you’ll notice an error because the .sheet modifier expects the item object to conform to Identifiable.
We can go to People.swift and add conformace to our Person struct.
struct Person: Identifiable {
	var id: Int
	var name: String
	var job: String
	var iconName: String
}
We already have an id parameter so we don’t need to do anything else to conform to the Identifiable protocol.
Step Four
Our SwiftUI views are now primed to react to a change in state. Let’s flesh out our new ViewPerson intent before we explore how to link the two.
Create a new Swift file called ViewPersonIntentHandler.swift.
As before, we’ll define our intent handler class conforming to NSObject and ViewPersonIntentHandling:
import Intents

class ViewPersonIntentHandler: NSObject, ViewPersonIntentHandling {

}
Build the project and you’ll be prompted to add the neccessary stubs to satisfy the protocol. These are functions to resolve the parameters and handle the intent.
Firstly, we’ll resolve the ‘note’ parameter. We’ll simply pass through the user’s note string or an empty string if they don’t enter anything.
func resolveNote(for intent: ViewPersonIntent, with completion: @escaping (INStringResolutionResult) -> Void) {
	let noteString = intent.note ?? ""
	completion(INStringResolutionResult.success(with: noteString))
}
With the person parameter, we need to pass in a collection of ShortcutsPerson objects for the user to pick from.
We’ll map our Person array into an array of ShortcutsPerson and create the expected INObjectCollection.
func providePersonOptionsCollection(for intent: ViewPersonIntent, with completion: @escaping (INObjectCollection<ShortcutsPerson>?, Error?) -> Void) {

	// We'll convert our list of Person in the peopleArray to ShortcutsPeople along with subtitles and images which will be displayed in the shortcuts action's parameter list
	let shortcutsPeople: [ShortcutsPerson] = peopleArray.map { person in
		let shortcutsPerson = ShortcutsPerson(identifier: nil,
											  display: person.name,
											  pronunciationHint: nil,
											  subtitle: person.job,
											  image: INImage.systemImageNamed(person.iconName))
		return shortcutsPerson
	}

	 // Create a collection with the array of ShortcutsPeople.
	 let collection = INObjectCollection(items: shortcutsPeople)

	 // Call the completion handler, passing the collection.
	 completion(collection, nil)
}
We’re going to throw an error if the user hasn’t selected any person to view in the app. To do this, let’s go back to our Intent Definition file and add a validation error to our person parameter.
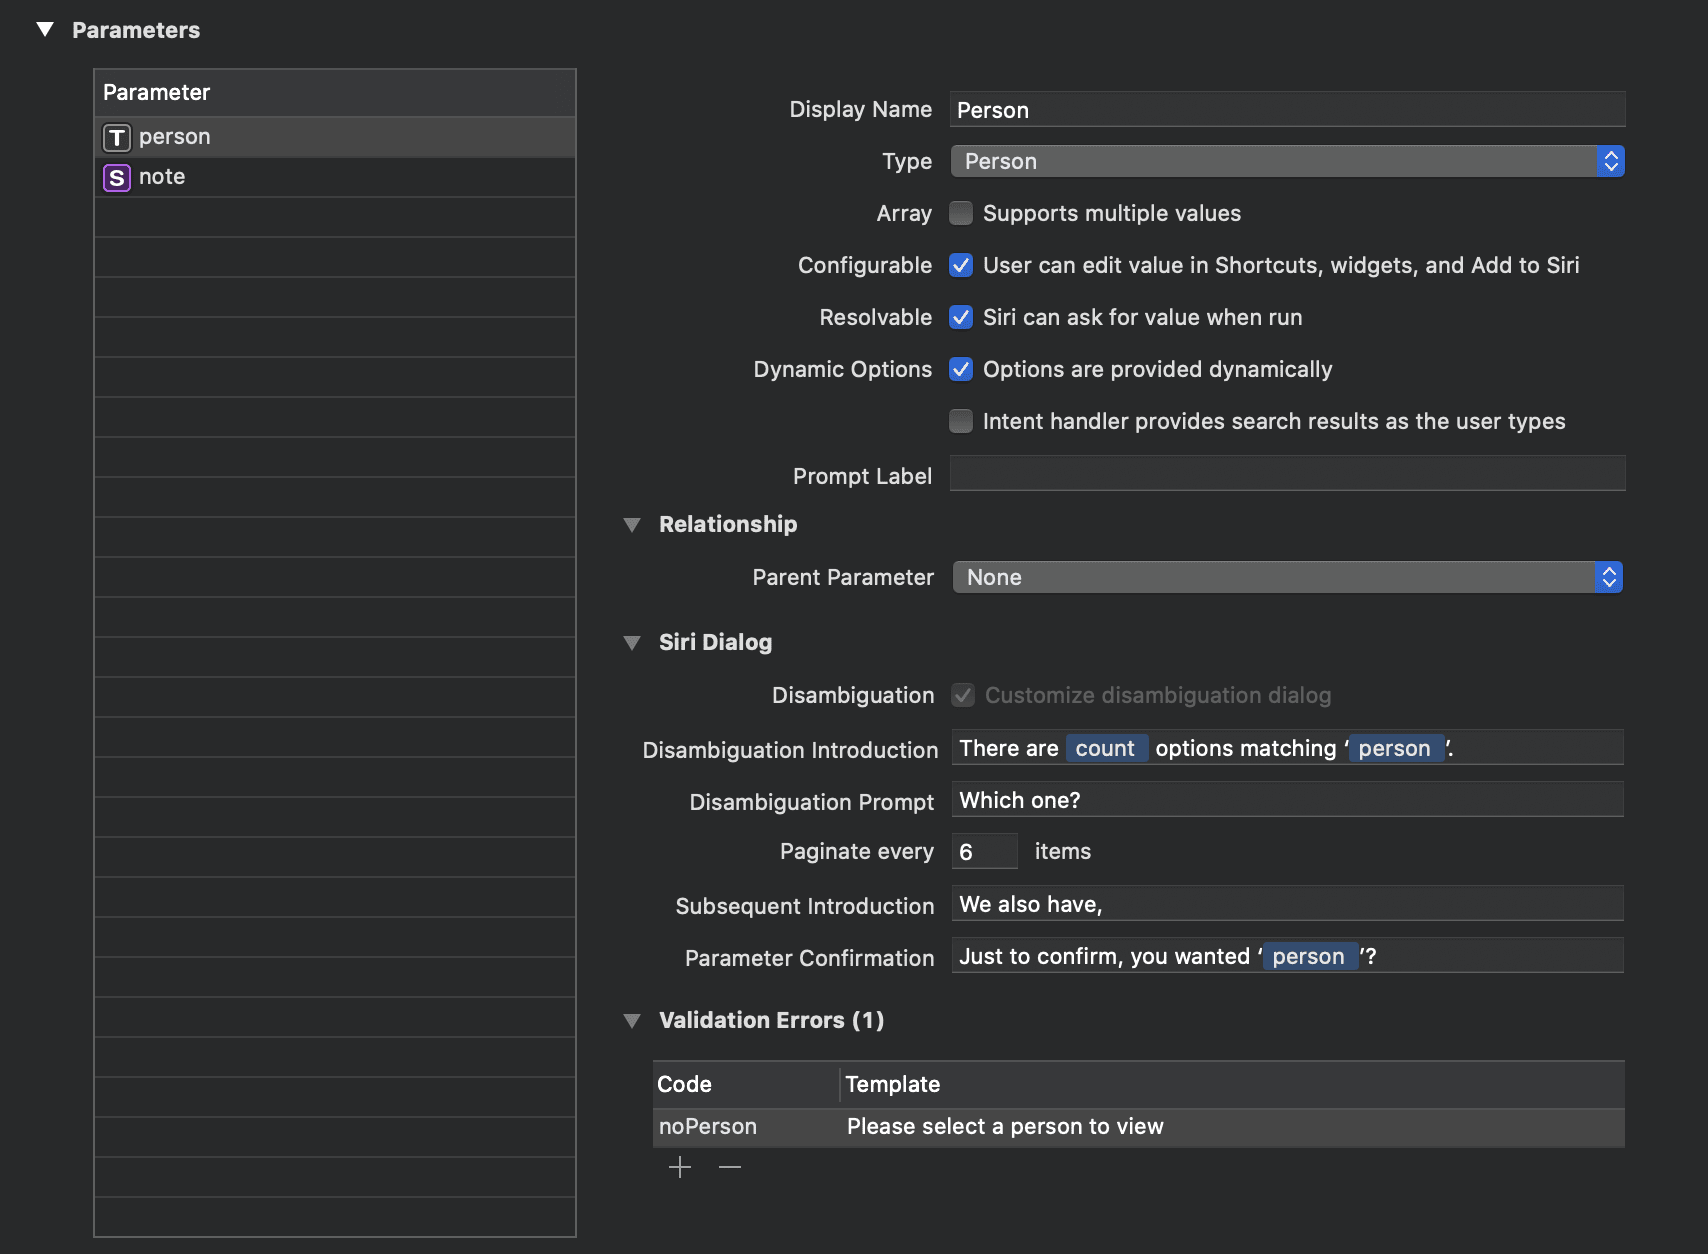
Back in our intent handler, we’ll throw an error if the person parameter is nil, otherwise we’ll resolve it.
func resolvePerson(for intent: ViewPersonIntent, with completion: @escaping (ViewPersonPersonResolutionResult) -> Void) {
	// Show an error if the user hasn't selected a person
	guard let person = intent.person else {
		completion(ViewPersonPersonResolutionResult.unsupported(forReason: .noPerson))
		return
	}
	completion(ViewPersonPersonResolutionResult.success(with: person))
}
With both of our parameters validated, let’s handle our intent.
We’re going to complete with a response code of .continueInApp which, as expected, will launch our app.
func handle(intent: ViewPersonIntent, completion: @escaping (ViewPersonIntentResponse) -> Void) {
	let userActivity = NSUserActivity(activityType: "com.alexhay.example.viewPerson")
	completion(ViewPersonIntentResponse.init(code: .continueInApp, userActivity: userActivity))
}
You can see we’re also passing in an NSUserActivity object with a unique ID. Before opening our app, SiriKit will populate its interaction property with our intent, as per the documentation.
If SiriKit determines that it needs to launch your app, either to handle the intent or respond to errors, it launches your app and delivers your user activity object. (Prior to delivery, SiriKit fills the interaction property of the user activity object with the intent and your response.) In your app, use the information in the provided user activity object to take whatever actions are appropriate
Here’s our complete intent handler code:
import Intents
import UIKit

class ViewPersonIntentHandler: NSObject, ViewPersonIntentHandling {
	func resolvePerson(for intent: ViewPersonIntent, with completion: @escaping (ViewPersonPersonResolutionResult) -> Void) {
		// Show an error if the user hasn't selected a person
		guard let person = intent.person else {
			completion(ViewPersonPersonResolutionResult.unsupported(forReason: .noPerson))
			return
		}
		completion(ViewPersonPersonResolutionResult.success(with: person))
	}

	func handle(intent: ViewPersonIntent, completion: @escaping (ViewPersonIntentResponse) -> Void) {
		let userActivity = NSUserActivity(activityType: "com.alexhay.example.viewPerson")
		completion(ViewPersonIntentResponse.init(code: .continueInApp, userActivity: userActivity))
	}

	func resolveNote(for intent: ViewPersonIntent, with completion: @escaping (INStringResolutionResult) -> Void) {
		let noteString = intent.note ?? ""
		completion(INStringResolutionResult.success(with: noteString))
	}

	func providePersonOptionsCollection(for intent: ViewPersonIntent, with completion: @escaping (INObjectCollection<ShortcutsPerson>?, Error?) -> Void) {

		// We'll convert our list of Person in the peopleArray to ShortcutsPeople along with subtitles and images which will be displayed in the shortcuts action's parameter list
		let shortcutsPeople: [ShortcutsPerson] = peopleArray.map { person in
			let shortcutsPerson = ShortcutsPerson(identifier: nil,
												  display: person.name,
												  pronunciationHint: nil,
												  subtitle: person.job,
												  image: INImage.systemImageNamed(person.iconName))
			return shortcutsPerson
		}

		 // Create a collection with the array of ShortcutsPeople.
		 let collection = INObjectCollection(items: shortcutsPeople)

		 // Call the completion handler, passing the collection.
		 completion(collection, nil)
	}


}
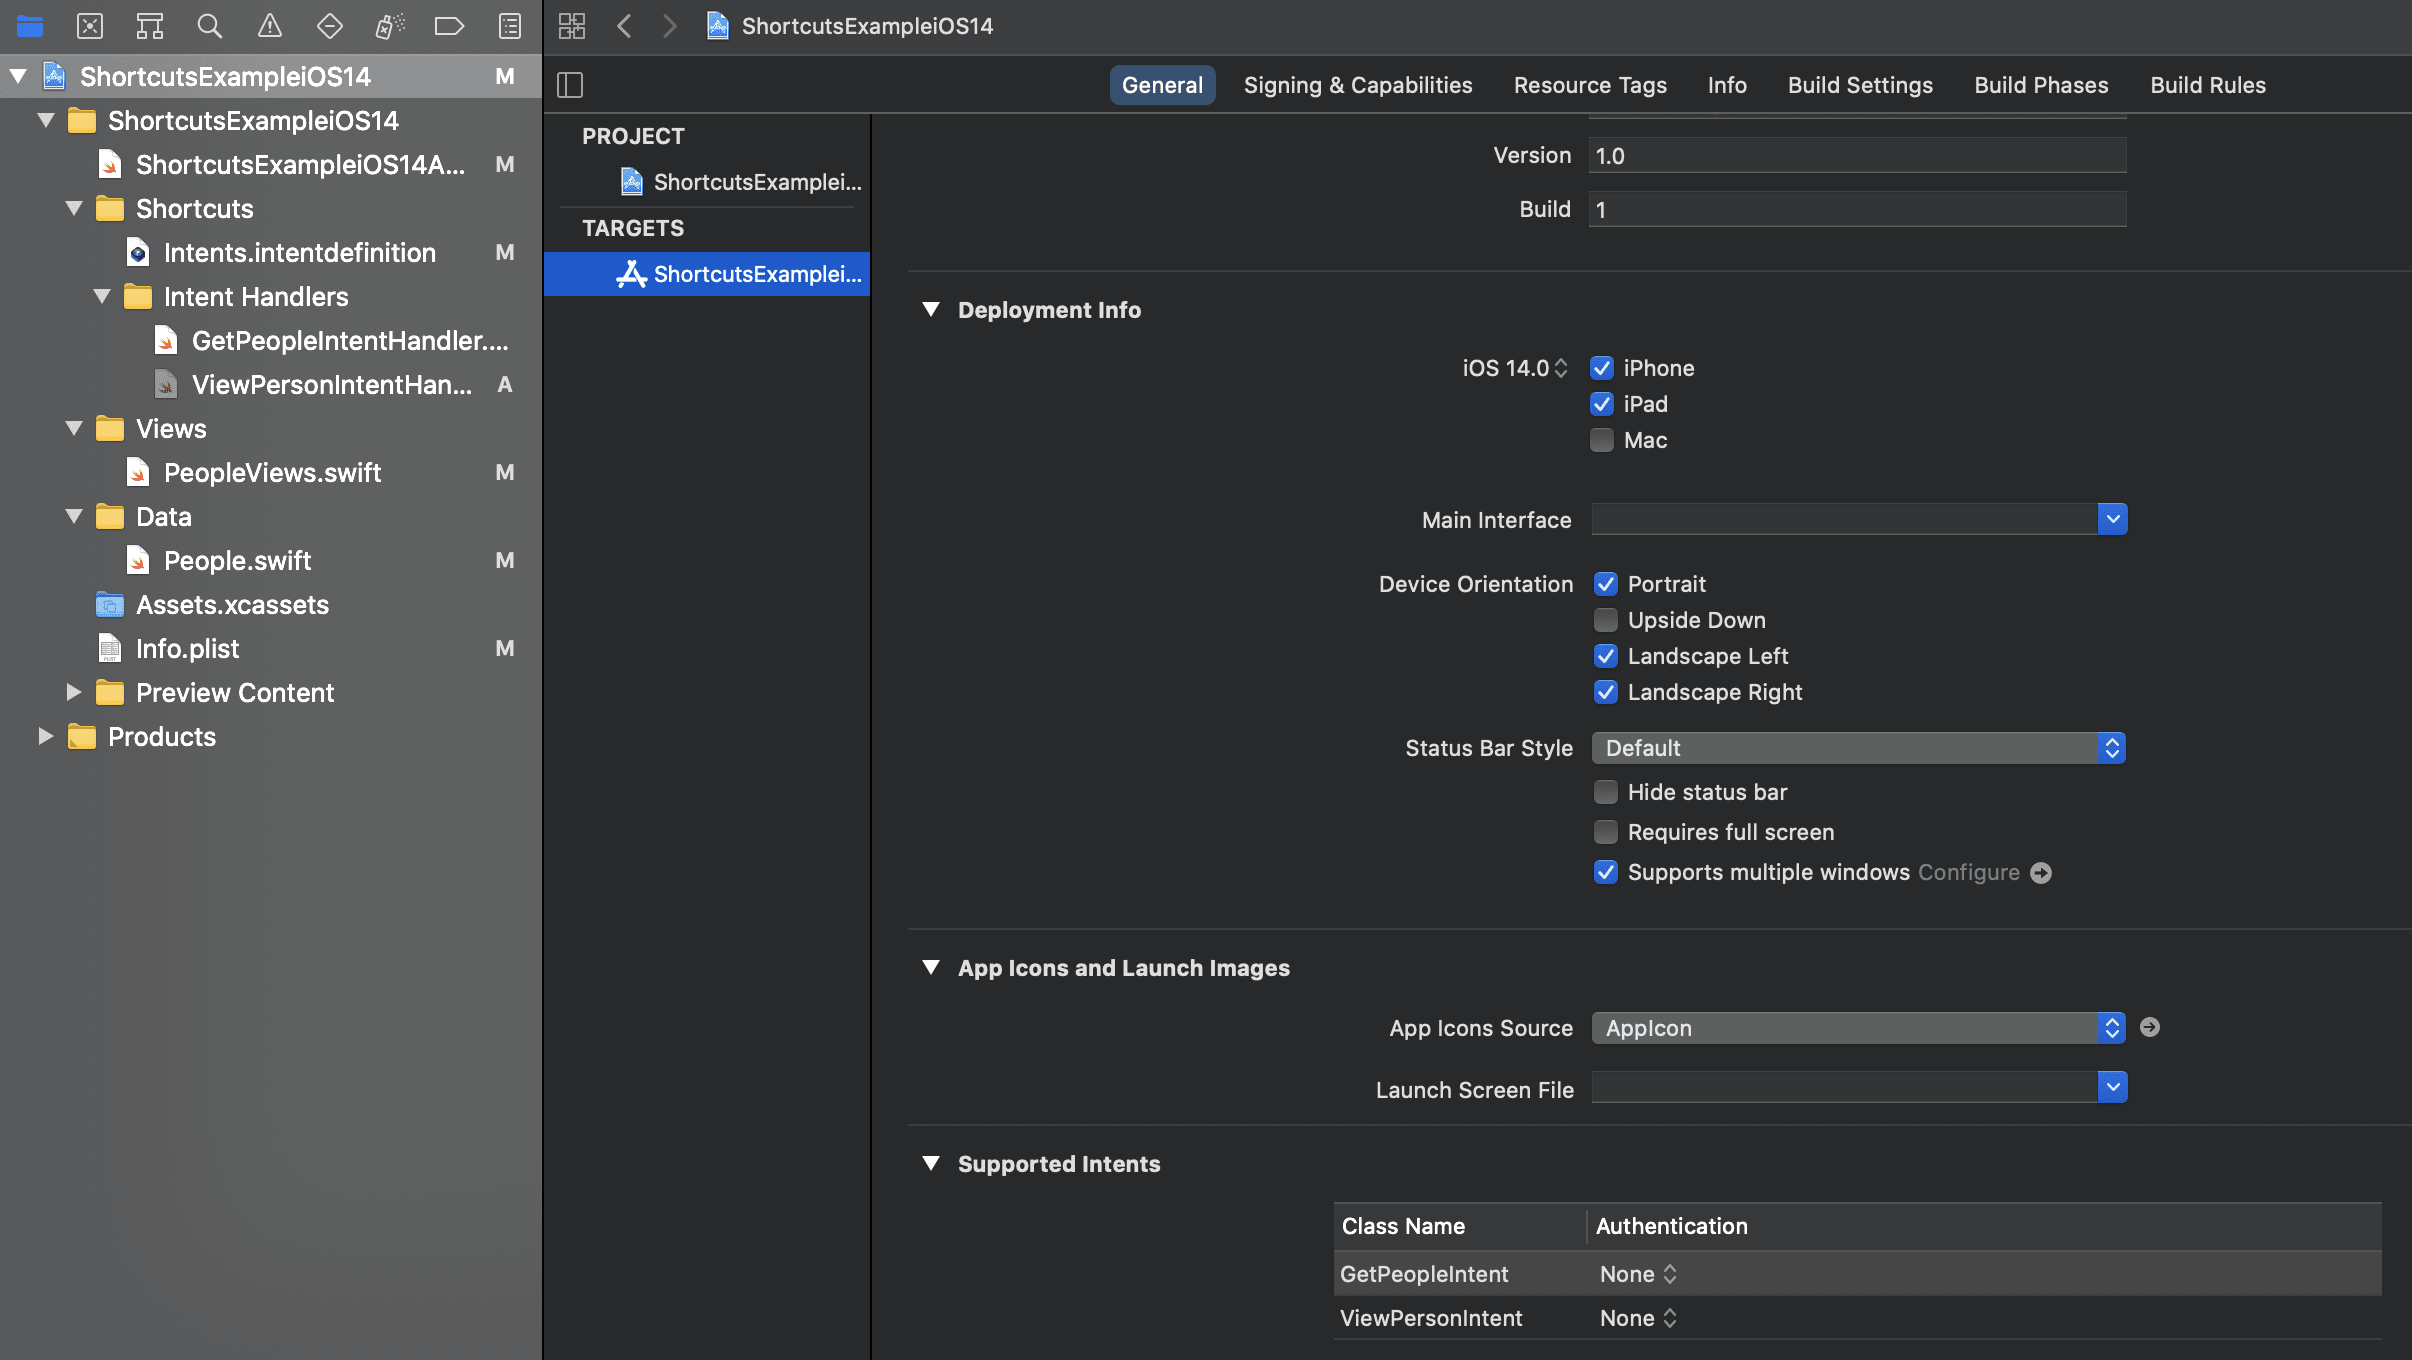
Step Five
Before we test our shortcut action, we need to add it as a supported intent in the app target’s general tab.
We also need to add a case to AppDelegate class in ShortcutsExampleiOS14App.swift to return the appropriate intent handler.
switch intent {
	// Call the appropriate intent handler
	case is GetPeopleIntent:
		return GetPeopleIntentHandler()
	case is ViewPersonIntent:
		return ViewPersonIntentHandler()

	default:
		return nil
}
Step Six
Build and run our app and add our View Person action to a new shortcut.
If we run it without selecting a person first, an error will be shown as expected.
When we tap on the ‘Person’ parameter, we now see a list of people to choose from, including a subtitle and thumbnail.
When we run the shortcut having selected a person, our app opens but… the detail page doesn’t show.

Let’s add the final piece of the puzzle to trigger the state change in our SwiftUI views.
Still in ShortcutsExampleiOS14App.swift, in the new App protocol in SwiftUI, we can add a .onContinueUserActivity to our PeopleListView().
.onContinueUserActivity("com.alexhay.example.viewPerson") { userActivity in
	if let intent = userActivity.interaction?.intent as? ViewPersonIntent,
	   let person = peopleArray.filter({ $0.name == intent.person?.displayString ?? "" }).first {
		note = intent.note ?? ""
		personToShow = person
	}
}
We’re using the same unique identifier for the user activity object as we used in the intent handler.
We check to see if the user activity’s interaction property has a populated intent property which type casts to our ViewPersonIntent.
If it does, we use the note and person fields to set our states and the detail modal displays.
Summary
Hopefully this tutorial has been helpful in showing how you can use the Visual List API to pick from a rich list of custom objects (including subtitles and images) inside of shortcut action’s parameter fields.
I hope it’s also provided some ideas of how you can push data and state changes from a shortcut action into a SwiftUI app.
It’s a very basic example but once you see how they can connect, you can be pushing data into your UserDefaults, Core Data stack or injecting state changes into your app’s environment.
You could even use some of the techniques detailed in this article to deep link into your app’s view hierarchy.
You can find this complete project on GitHub.
Any problems, questions or suggestions, let me know on on Twitter!
- Part 1: Creating a project and adding the first action
- Part 2: Exploring parameters: arrays, enums, calculated lists and files
- Part 3: In-app intent handling, custom output types, visual list API and using the SwiftUI app protocol
- Part 4: Visual Lists in parameters and pushing data from Shortcuts into a SwiftUI view